How do I make a jewellery bench?

Everything related to jewellery making is expensive. It’s not just the metal and gemstones. It’s also the tools and the workbench.
After 2 years working from kitchen counters and worse, I knew I could make my own bench.
All the money saved from that is spent on tools (a value pack of off-brand needle files, has convinced me to only buy quality tools).
Do you want to make your own jewellery bench as well?
Here’s how I did it.
It starts at Ikea
I knew I didn’t want to make a bench from complete scratch (the thought of sawing and filing the legs to the exact same height is making me sweat. I’ll save that kind of stress for jewellery). A trip to Ikea to look for a table/desk/kitchen island that would be the perfect height was in order.
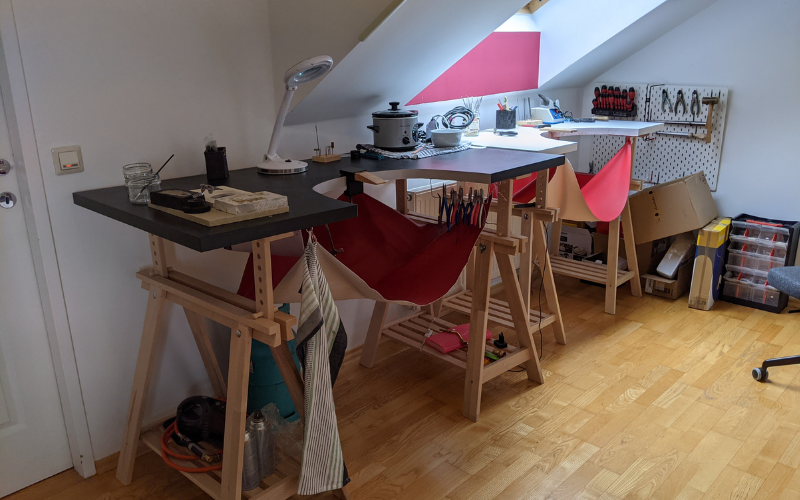
I found one great desk: LINNMON / FINNVARD. 2 Sets of A-frame legs with a height-adjustable tabletop that is 75x150 cm. The A-frame legs make the overall desk sturdier (less shaking when you’re working) and the tabletop is adjustable to a perfect jewellery bench height.
Cut out an opening
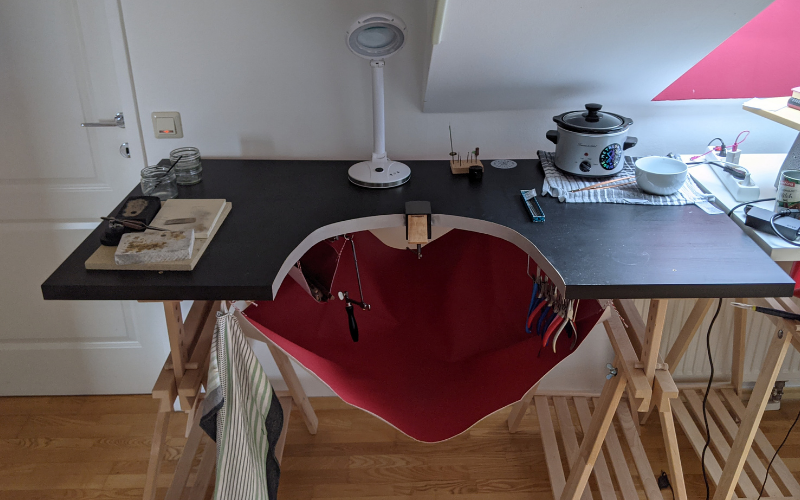
After assembling the desk, I cut out a half-round shape in the tabletop with a table saw. I made the opening wide enough to comfortably slide in with my chair, not hit my elbows on the edges and still have enough worktop space all the way around.
The tabletop is made from pressed hardboard and honeycomb paper filling. After cutting the section out, there were lots of little openings for lemel to get stuck. To close that all off, I used iron-on edging tape (I had to buy an iron for this, sorry mom I never iron my clothes).
Skin
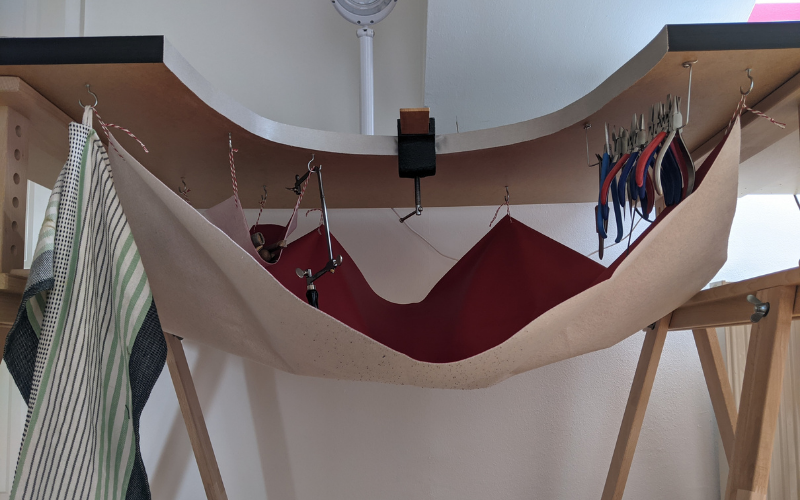
To catch lemel and other bits, I use a skin. I’ve used benches that have drawers to catch lemel, but I find those really hard to work with. Ideally, you want to use real leather, but leatherette will work just as well. If you’re soldering at your bench, make sure the leatherette is thick enough or has some backing to be a little heat resistant. If you drop something hot in there, you don’t want it to burn straight through it and onto your legs.
Cut a square piece of leatherette. Make a small hole in all the corners and thread some string through. Attach 4 hooks at the bottom of the tabletop. The 2 at the front are close to the opening. The 2 at the back are a little more in the middle (the 4 hooks form a trapezoid, not a square). You can hang the bench skin from the hooks.
It can take a little manoeuvring to get the skin to drape how you like. Try adjusting the length of the strings, or change the position of the hooks. I’ve got mine hanging so I don’t touch the skin with my saw when piercing (my BIGGEST annoyance is when I hit the skin with my saw on EVERY saw stroke), my legs go under it easily and the material doesn’t bunch up on my lap.
I can easily brush the lemel out of the skin. And (very) occasionally I even clean it with a damp cloth.
Tool storage
To keep my most used tools close, but the worktop empty, I added 2 places for tools.
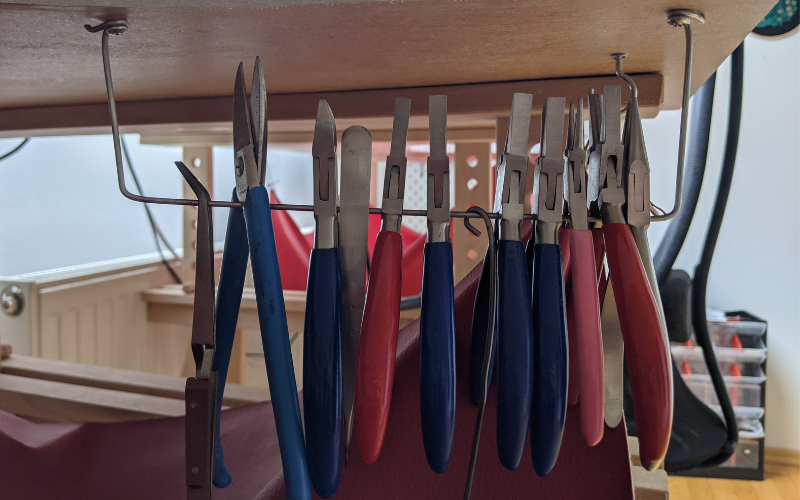
Plier rack: shape a length of wire into a wide U shape. Make a loop at the ends. You can attach the wire to your bench with a screw through the loops. And hang all your pliers from it. I’m right handed, so my plier rack is on the right side.
I used an old clothing hanger for this.
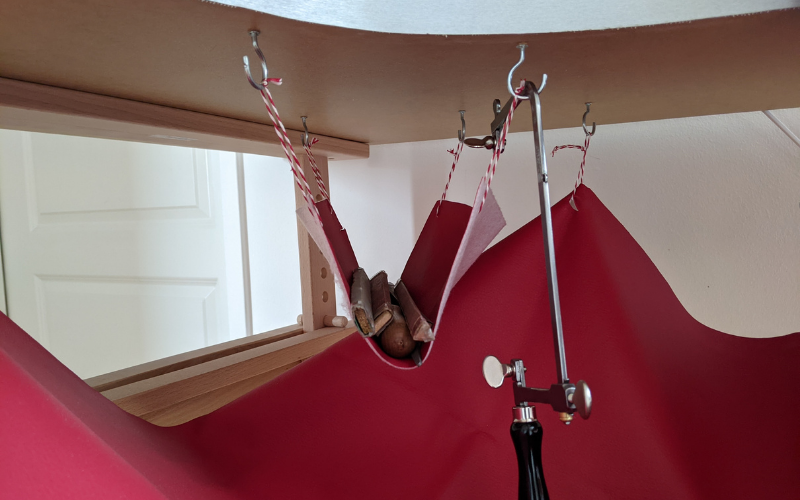
File hammock: I cut a little rectangle from leftover leatherette. Make a hole in each corner and thread some string through. I attached 4 hooks under the bench on the left side, and hang the hammock from there. I keep all my hand files and emery sticks in there.
Bonus storage: I hang my saw from one of the hooks when I’m not using it.
What would I improve?
If you want to make a bench like this from scratch, here are some things I would improve from my bench.
Use a solid wooden worktop instead of the pressed hardboard and honeycomb paper filling that this one is made of. The solid wood will add stability and it’ll save you the need to iron the edge banding.
The A-frame legs are wide. That’s good, it gives the bench stability. BUT that doesn’t leave a lot of space to fit your chair between them. A chair fits, but I do bump into the legs from time to time. I would make the A-frames a little narrower so there is more space for a chair between them.
And if you want even more stability, attach the bench to the wall.
Out of stock
After using my bench for about half a year, I decided I needed a second one. I’m lazy and having a separate metal and wax bench has improved my mood (less cleaning = happier me). I’m happy with my bench so I wanted to get the same desk and adjust it as well.
I panicked when I couldn’t find my desk on the Ikea website (lockdown life). When I’d almost given up I found the same desk setup, only smaller (this one is 60x120)
My new wax bench is LAGKAPTEN / MITTBACK. It’s exactly the same, just smaller.
If you have a choice between the 2, I would get the larger one. I like space to make a mess. And with the smaller one, I bump into the legs with my chair more often.
Is it as good as a real jewellers bench?
To me, it is. My bench is perfect for everything I need from it. Would I use it for excessive hammering? No. But I wouldn’t use a real jewellers bench for that either.
Did you make your own bench?
Leave a comment and let me know if you’re going to make your own bench after reading this. Or if you’ve already made your own bench what you like about it!